Log In With Audius
Log In with Audius lets you retrieve a user's Audius profile information and optionally get permission to perform actions on their behalf, without making the user give you their Audius password.
Quickstart
<div id="audiusLogInButton"></div>
import Web3 from 'web3'
import { sdk } from '@audius/sdk'

window.Web3 = Web3

const audiusSdk = sdk({ apiKey: 'Your API key goes here' })

audiusSdk.oauth.init({
  successCallback: (userInfo) => {
    console.log('Log in success!', userInfo)
  },
})

audiusSdk.oauth.renderButton({
  element: document.getElementById('audiusLogInButton'),
  scope: 'read', // use "write" instead if you'd like to request read/write access to user's account
})
Don't have an API key? Get one by creating a developer app on the Audius Settings page.
Examples
- Demo with React - Demo app | Code
- Demo with vanilla JS - Demo app | Code
- Log In Button Generator
Full Reference
1. Install the JavaScript SDK
If you are not able to use the JavaScript SDK (for example, if you are developing a mobile app), skip to Manual Implementation.
In your terminal, run the following:
npm install web3 @audius/sdk
Then, initialize the SDK:
import Web3 from 'web3'
import { sdk } from '@audius/sdk'

window.Web3 = Web3
const audiusSdk = sdk({ apiKey: 'Your API Key goes here' })
See complete instructions here to install and initialize the JavaScript SDK.
2. Initialize the SDK oauth feature
audiusSdk.oauth.init({
  successCallback: (res) => {
    // This will run if the user logged in successfully.
    console.log('Log in success!', res)
    /**
     `res` will contain the following user information:
      {
        userId: number; // unique Audius user identifier
        email: string;
        name: string; // user's display name
        handle: string;
        verified: boolean; // whether the user has the Audius "verified" checkmark
        profilePicture: {"150x150": string, "480x480": string, "1000x1000": string } | null // URLs for the user's profile picture
        apiKey: string | null // the API key for your application if specified
        sub: number; // alias for userId
        iat: string; // timestamp for when auth was performed
      }
    **/
  },
  errorCallback: (err) => {
    // This will run if there was an error during the auth flow.
    console.log('Error :(', err)
    // `err` will contain the error message
  },
})
3. Render the Log In button
audiusSdk.oauth.renderButton({
  element: document.getElementById('audiusLogInButton'),
  scope: 'read', // Change to "write" if you need write access to users' accounts
  buttonOptions: {
    size: 'large',
    corners: 'pill',
    customText: 'Continue with Audius',
  },
})
<div id="audiusLogInButton"></div>
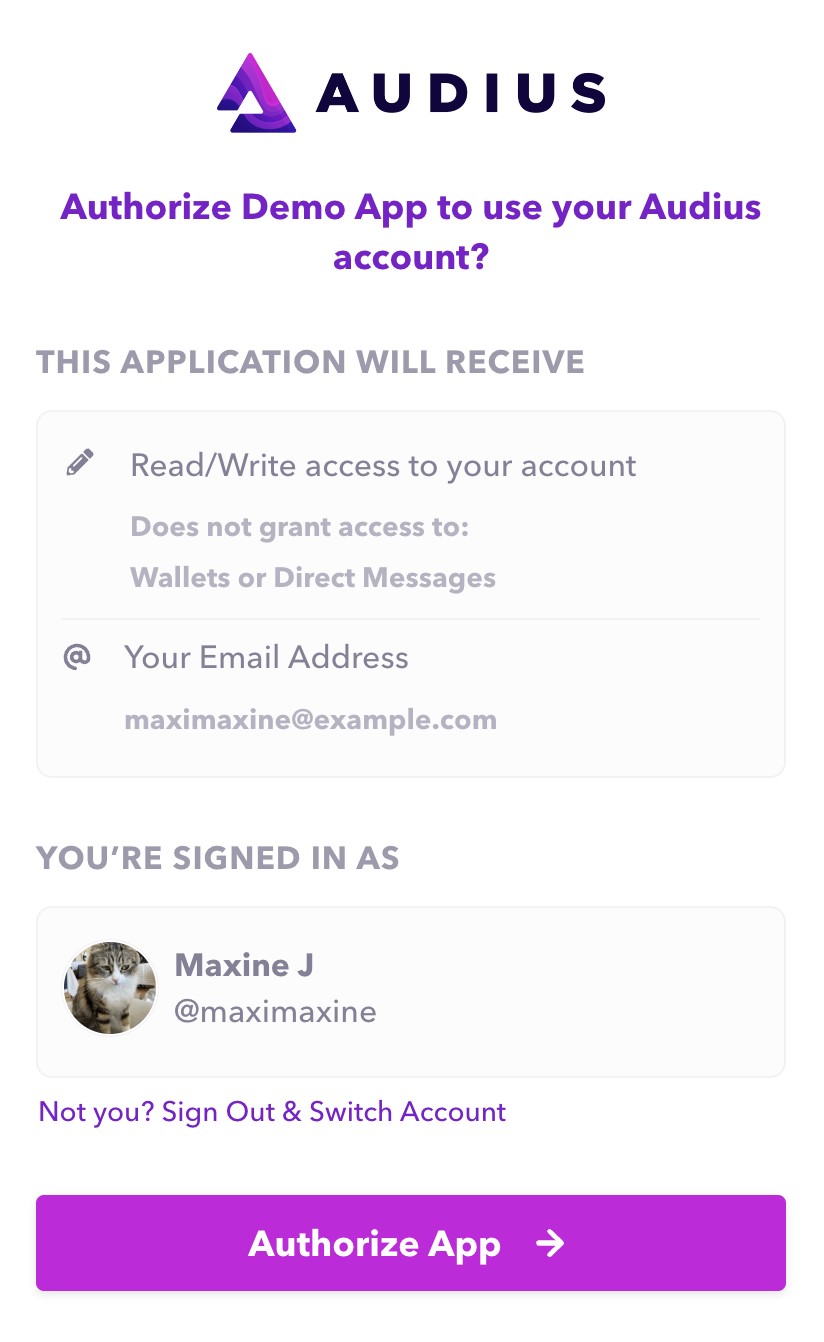
renderButton replaces the given element with the Log In
with Audius button.
If scope is set to "write", the user will be prompted to grant your app read/write access to
their account (allowing your app to perform actions like uploading a track on the user's behalf). If
scope is set to "read", the user will be prompted to grant your app read-only access to their
account.
The write scope grants your app permission to perform most actions on the user's behalf, but it
does NOT allow any access to DMs or wallets.
You can also pass in buttonOptions, an optional object with customization settings for the button.
Use this playground to explore the different button options.
If you don't want to use renderButton, you can implement a login button yourself and invoke the
login popup with audiusSdk.oauth.login.
Optional: Show loader until the button is ready
The button may take up to a couple of seconds to load. You may want to show a loading indicator until the button has loaded for an optimal user experience.
<!-- Surround your element that will be replaced with the Log In with Audius button with a parent, e.g.: -->
<div id="parent">
  <div id="audiusLogInButton"></div>
  <div id="loading">Loading...</div>
</div>
const observer = new MutationObserver(function (mutations_list) {
  mutations_list.forEach(function (mutation) {
    mutation.addedNodes.forEach(function (added_node) {
      if (added_node.id == 'audius-login-button') {
        // Login button has rendered
        document.querySelector('#loading').remove()
        observer.disconnect()
      }
    })
  })
})

observer.observe(document.querySelector('#parent'), {
  subtree: false,
  childList: true,
})
The log in button will be rendered with an id of audius-login-button. As shown above, you can
detect when the element has been added using a MutationObserver.
5. Optional: Write on behalf of the Audius user
Once a user has authorized your app with the write scope, you can easily perform actions on their
behalf using the SDK.
Simply initialize the SDK with your API Key and Secret and begin using the various write methods.
const audiusSdk = sdk({
  apiKey: 'Your API Key goes here',
  apiSecret: 'Your API Secret goes here',
})

const track = await audiusSdk.tracks.favoriteTrack({
  trackId: 'D7KyD',
  userId: 'Audius user ID of user who gave your app write access',
})
Be careful to not expose API secrets on your frontend!
6. Done!
Retrieving email addresses
Once you know your user's Audius user id, you can retrieve their Audius information at any time using our SDK or web APIs. However, the one piece of profile information that is not available outside of the Log In with Audius response is the user's email address. If you do not initially store the user's email address, you can only re-retrieve the email through having the user re-complete the Log In with Audius flow. :::
Example use cases
Write scope
- Upload tracks to your users' Audius accounts
- Save tracks to your users' Audius libraries
Read-only scope
- Provide a convenient way for users to sign up and/or log in to your app without having to set a password or fill in a profile form
- Associate a user to their Audius account so that you can retrieve their Audius data (e.g. retrieve their tracks)
- Confirm if a user is a "Verified" Audius artist
However, note that this flow CANNOT:
- Manage the user's login session on your app
Workflow
The "Log In with Audius" flow looks like this:
- You provide a button on your app or website to begin the authentication flow
- When the user clicks the button, it opens the Log In with Audius page
- Once the user successfully authorizes your app, Audius provides your app/website with the user profile using a JSON Web Token (JWT)
- Your app verifies and decodes the JWT
The JWT payload contains the following information about the user:
- Unique identifier (Audius user id)
- Display name
- Audius handle
- Whether the user is a verified artist (i.e. has a purple checkmark)
- Profile picture URL
Manual Implementation
If you are not able to use the Audius JavaScript SDK, you may implement Log In with Audius manually by following the steps below.
1. Open the Log In with Audius prompt page
Create a "Log In with Audius" button on your app.
If using HTML (or HTML-like markup) and CSS, check out this playground to easily customize and generate code for an Audius-branded login button.
Clicking your log in button should direct the user to the Log In with Audius prompt page.
On a native app, the log in button should open a secure web browser within the app that loads the Audius login page. A web app should open the Audius login page in a popup or redirect to it.
The Log In with Audius prompt page is located at the following URL:
https://audius.co/oauth/auth?scope={read|write}&api_key={Your API Key}&redirect_uri={Your Redirect URI}&origin={Your App Origin}&state={Your State Value}&response_mode={query|fragment}
You must open this page with the required URL parameters, described below.
Params
-
scope
"read" | "write"- the scope of the authentication request. Use"write"if your app will request read/write access to the user's account; otherwise, use"read"if your app only needs read access. -
api_key
string- your app's Audius API Key. If you don't have one, you can create one on the Audius Settings page. -
redirect_uri
string- the location that the Audius login page should redirect to once the user successfully authenticates. A URL protocol of http or https is required. You can use the special valuepostmessagehere if you would like the login page to send the response back to its opener usingwindow.postMessageinstead of using a redirect. Otherwise, the following validation rules apply:- Hosts cannot be raw IP addresses UNLESS they are localhost IP addresses
- Cannot contain the fragment component (
#) - Cannot contain the
userinfocomponent - Cannot contain a path traversal (contain
/..or\..) - Must contain valid characters and URI format
-
origin optional
string- only applicable and required ifredirect_uriis set topostmessage. If so, this value should be set to the origin of the window that opened the Log In with Audius popup. -
state optional but highly recommended
string- any string. When the user is redirected back to your app, the exactstatevalue you provide here will be included in the redirect (in thestateURI fragment parameter). This field should be leveraged as a CSRF protection mechanism (read more here or here), and may also be used as a way to persist any useful data for your app between where thestatevalue is generated and where the redirect goes. -
response_modeoptional, not recommended when possible"fragment" | "query"- specifies whether the auth flow response parameters will be encoded in the query string or the fragment component of the redirect_uri when redirecting back to your app. Default behavior is equivalent to "fragment". We recommend NOT changing this if possible. -
displayoptional"popup" | "fullScreen"- determines whether the auth flow expects to be rendered in a popup or a full screen view. Defaulted to"popup"if unspecified.
Example
<a
  href="https://audius.co/oauth/auth?scope=read&app_name=My%20Demo%20App&redirect_uri=https://mydemoapp.com/oauth/receive-token&state=a4e0761e-8c21-4e20-819d-5a4daeab4ea9"
  >Click me to log in with Audius!</a
>
If the user exits the authentication flow before completing it--e.g. by closing the window--your app should detect this and have the UI respond accordingly.
2. Receive the response
If you used a redirect URI:
When the user has successfully authenticated, the Log In with Audius page will redirect to the
redirect URI that you specified, with 1) the JWT containing the user profile, and 2) the original
state value you provided (if any) included in the URI fragment (or query string, if
response_mode was set to query). To illustrate, going off the example above where we opened the
login page with the following URL:
https://audius.co/oauth/auth?scope=read&app_name=My%20Demo%20App&redirect_uri=https://mydemoapp.com/oauth/receive-token&state=a4e0761e-8c21-4e20-819d-5a4daeab4ea9
when the user successfully authenticates, the login page would redirect to:
https://mydemoapp.com/oauth/receive-token#state=a4e0761e-8c21-4e20-819d-5a4daeab4ea9&token={JWT}
where {JWT} is a JSON web token containing the user's encoded
profile information and a signature.
response_mode=query when opening the login page, the login page wouldinstead redirect to...:
https://mydemoapp.com/oauth/receive-token?state=a4e0761e-8c21-4e20-819d-5a4daeab4ea9&token={JWT}
Skip to Handling the response below for what to do next.
If you used redirectURI=postmessage:
When the user has successfully authenticated, the Log In with Audius page will send a message via
window.postMessage to the window that opened it. The message will contain a JWT containing the
user profile as well as whatever state value you originally specified in the corresponding URL
param, if any.
For instance, if your app opened the login page using the following URL:
https://audius.co/oauth/auth?scope=read&app_name=My%20Demo%20App&redirect_uri=https://mydemoapp.com/oauth/receive-token&state=a4e0761e-8c21-4e20-819d-5a4daeab4ea9
the message would look like this:
{
  token: <JWT>,
  state: 'a4e0761e-8c21-4e20-819d-5a4daeab4ea9'
}
where <JWT> is a JSON web token containing the user's encoded
profile information and a signature.
Make sure that your postMessage event listener validates that the origin of the incoming event is
https://audius.co!
3. Verify the response
Extract the JWT (token) from the URI fragment or query string (if you used a redirect) or the
event message (if you used postmessage).
Once you have the token, you must send it to the Audius verify_token endpoint in order to verify
that:
- the signature was signed by the Audius user who completed the authentication
- the content of the token hasn't been tampered with
Upon verifying the validity of the JWT, the endpoint will return the authenticated user's decoded profile information.
GET /v1/users/verify_token?token=[JWT]Params
- token
string- the JWT from the authentication flow that you would like to verify
Sending the request
To use the API, you first select an API endpoint from the list of endpoints returned by:
GET https://api.audius.co
Once you've selected a host, all API requests can be sent directly to it. For instance, if you
picked the host at https://audius-dp.singapore.creatorseed.com, you would send the GET request to
https://audius-dp.singapore.creatorseed.com/v1/users/verify_token?token=<JWT>, where <JWT> is
replaced with the JWT you retrieved in the auth flow.
We recommend selecting a host each time your application starts up as availability may change over time.
Success response
- Code: 200 OK
- Content: The decoded JWT payload, which contains the user's profile information:
{
  userId: number, // unique Audius user identifier
  email: string,
  name: string, // user's display name
  handle: string,
  verified: boolean, // whether the user has the Audius "verified" checkmark
  profilePicture: {"150x150": string, "480x480": string, "1000x1000": string } | null // URLs for the user's profile picture
  apiKey: string | null // the API key for your application if specified
  sub: number, // alias for userId
  iat: string, // timestamp for when auth was performed
}
Error responses
Invalid signature:
- Code:
404Not Found - Content: Error message describing the issue that occurred, e.g. "The JWT signature is invalid - wallet could not be recovered."
Problem with token input:
- Code:
400Bad Request - Content: Error message, e.g. "the JWT signature could not be decoded."
3. Done!
Once you've verified the JWT, the authentication flow is complete and you now have your user's Audius profile information.
If you used the write scope, you can use the Audius SDK to perform actions on behalf of the user
who authorized your app:
const audiusSdk = sdk({
  apiKey: 'Your API Key goes here',
  apiSecret: 'Your API Secret goes here',
})

const track = await audiusSdk.tracks.favoriteTrack({
  trackId: 'D7KyD',
  userId: 'Audius user ID of user who gave your app write access',
})
See Getting Started with the SDK or the SDK methods reference for further reading.